Chokuretsu ROM Hacking Challenges Part 1 – Cracking a Compression Algorithm!
Howdy folks! This is the first in a series of blog posts that will delve into the technical challenges involved in translating Suzumiya Haruhi no Chokuretsu (The Series of Haruhi Suzumiya). These blogs do get quite technical and include things like code samples, but are written to be intelligible to a general audience. If you have any questions or comments, feel free to tweet at us!
This whole project started with two posts on the GBATemp forum from a user named Cerber (now one of our graphic designers!) asking for help translating an obscure DS game based on the Haruhi series. He had made some progress on finding the script in the game and replacing it with English characters, but was getting stuck on being able to reinsert text fully.
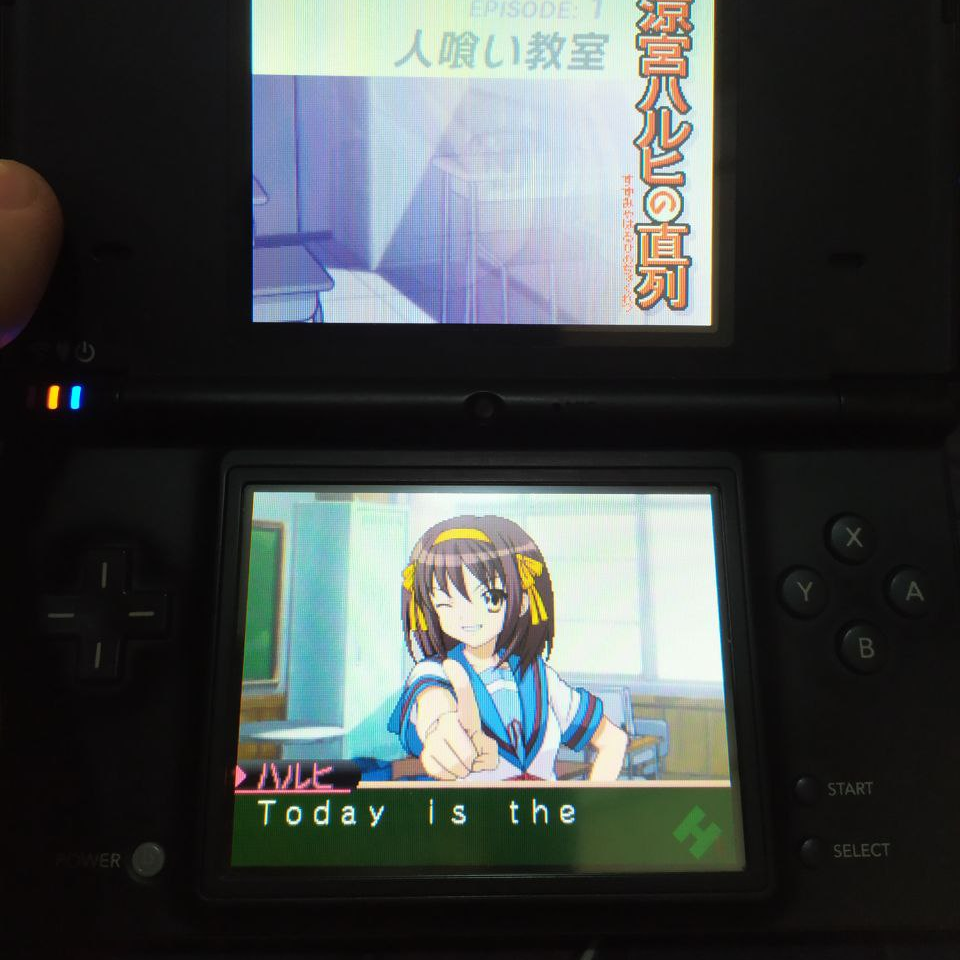
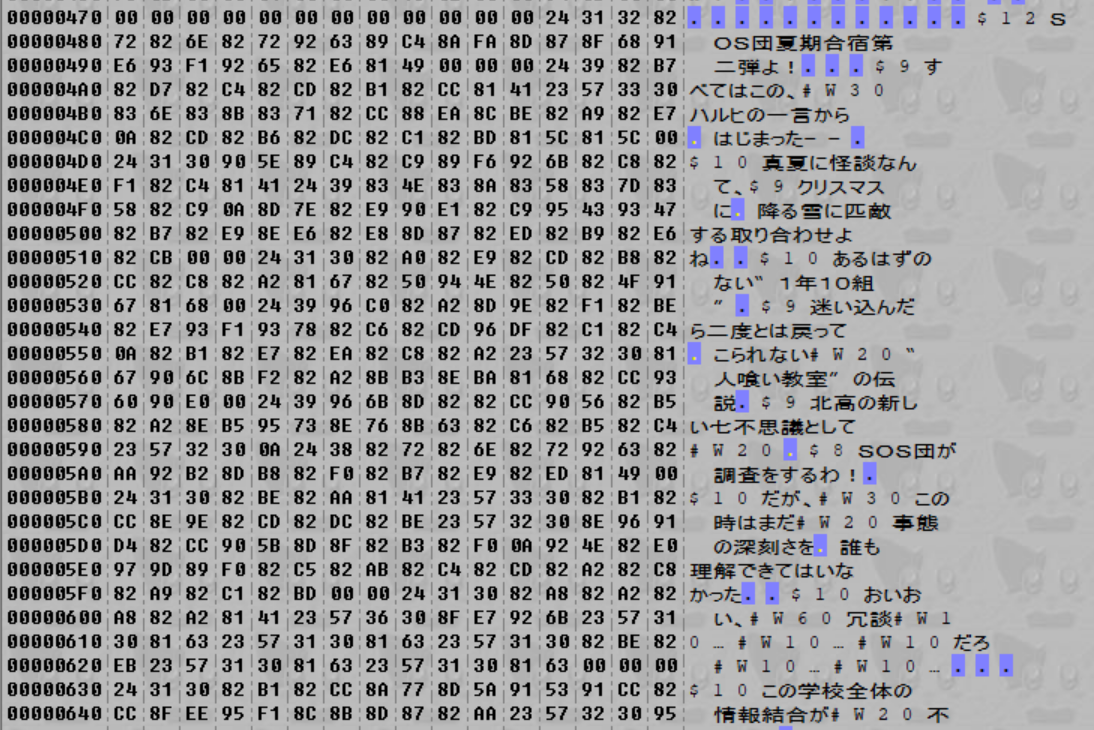
What Cerber was doing precisely was opening up the ROM in a hex editor (a tool for modifying binary files directly where each byte is represented as a hexadecimal number) and searching for the text he was seeing in-game. He was able to find the script, but the issue he was having was dealing with what he called “game code” that surrounded the text he was trying to replace – modifying the sections he marked in red broke the game entirely.
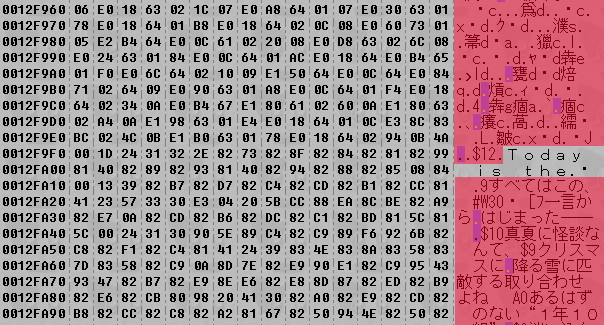
A quick explanation of what we’re seeing here: on the left, we have the raw binary in the file, represented as a series of bytes in hexadecimal. Hexadecimal is also called base 16 – while we normally use decimal (base 10 – i.e. 0, 1, 2, 3, 4, 5, 6, 7, 8, 9) and computers use binary (base 2 – i.e. 0, 1), programmers often use hexadecimal because it allows us to represent a single byte in two characters. When writing numbers, to distinguish the base we often use 0x as a prefix for hex numbers (0x17 is 23 in decimal) and 0b to represent binary numbers (0b0000_0100 is 4 in decimal).
The characters on the right represent the bytes we’re seeing on the left interpreted through an encoding. You might be familiar with ASCII, the most basic of encodings – each letter in the alphabet is represented by a single byte. This game uses an encoding called Shift-JIS, which is how Japanese was represented prior to the advent of Unicode.
Drawing on my past experience, I did some investigation and then posted a perhaps less-than-hinged reply:
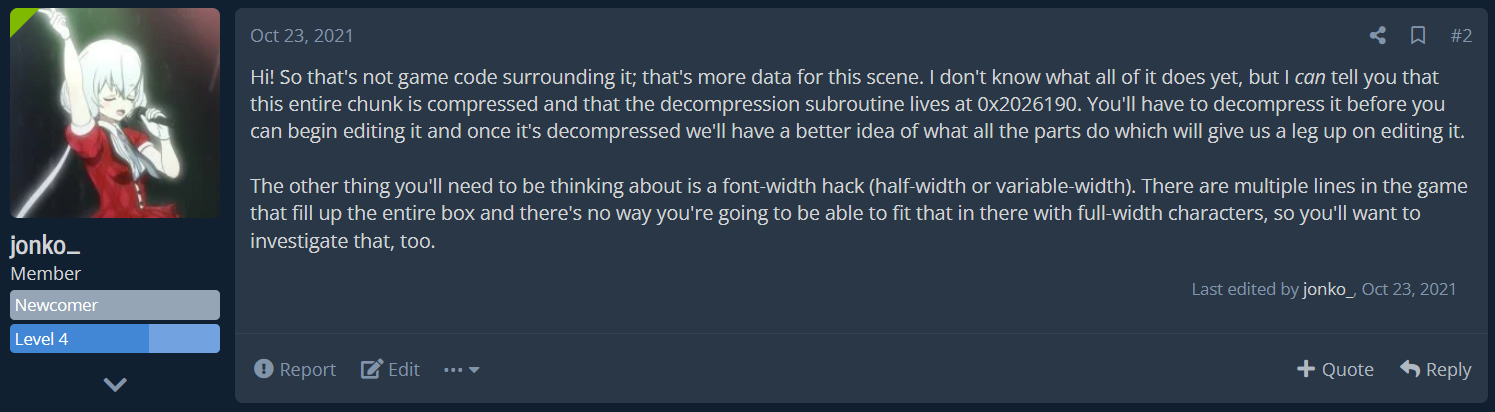
Hi! So that's not game code surrounding it; that's more data for this scene. I don't know what all of it does yet, but I can tell you that this entire chunk is compressed and that the decompression subroutine lives at 0x2026190. You'll have to decompress it before you can begin editing it and once it's decompressed we'll have a better idea of what all the parts do which will give us a leg up on editing it.
The other thing you'll need to be thinking about is a font-width hack (half-width or variable-width). There are multiple lines in the game that fill up the entire box and there's no way you're going to be able to fit that in there with full-width characters, so you'll want to investigate that, too.
So let’s go through this point-by-point.
Compression
How did I know that this section was compressed? Well, looking at his screenshot, we can clearly see that the in-game text is showing up in the hex editor (I’ve marked an example in yellow below), but some portions of the text are missing – for example, the “ハルヒの” bit that I’ve marked below is replaced by a shorter character sequence that I’ve highlighted in blue.
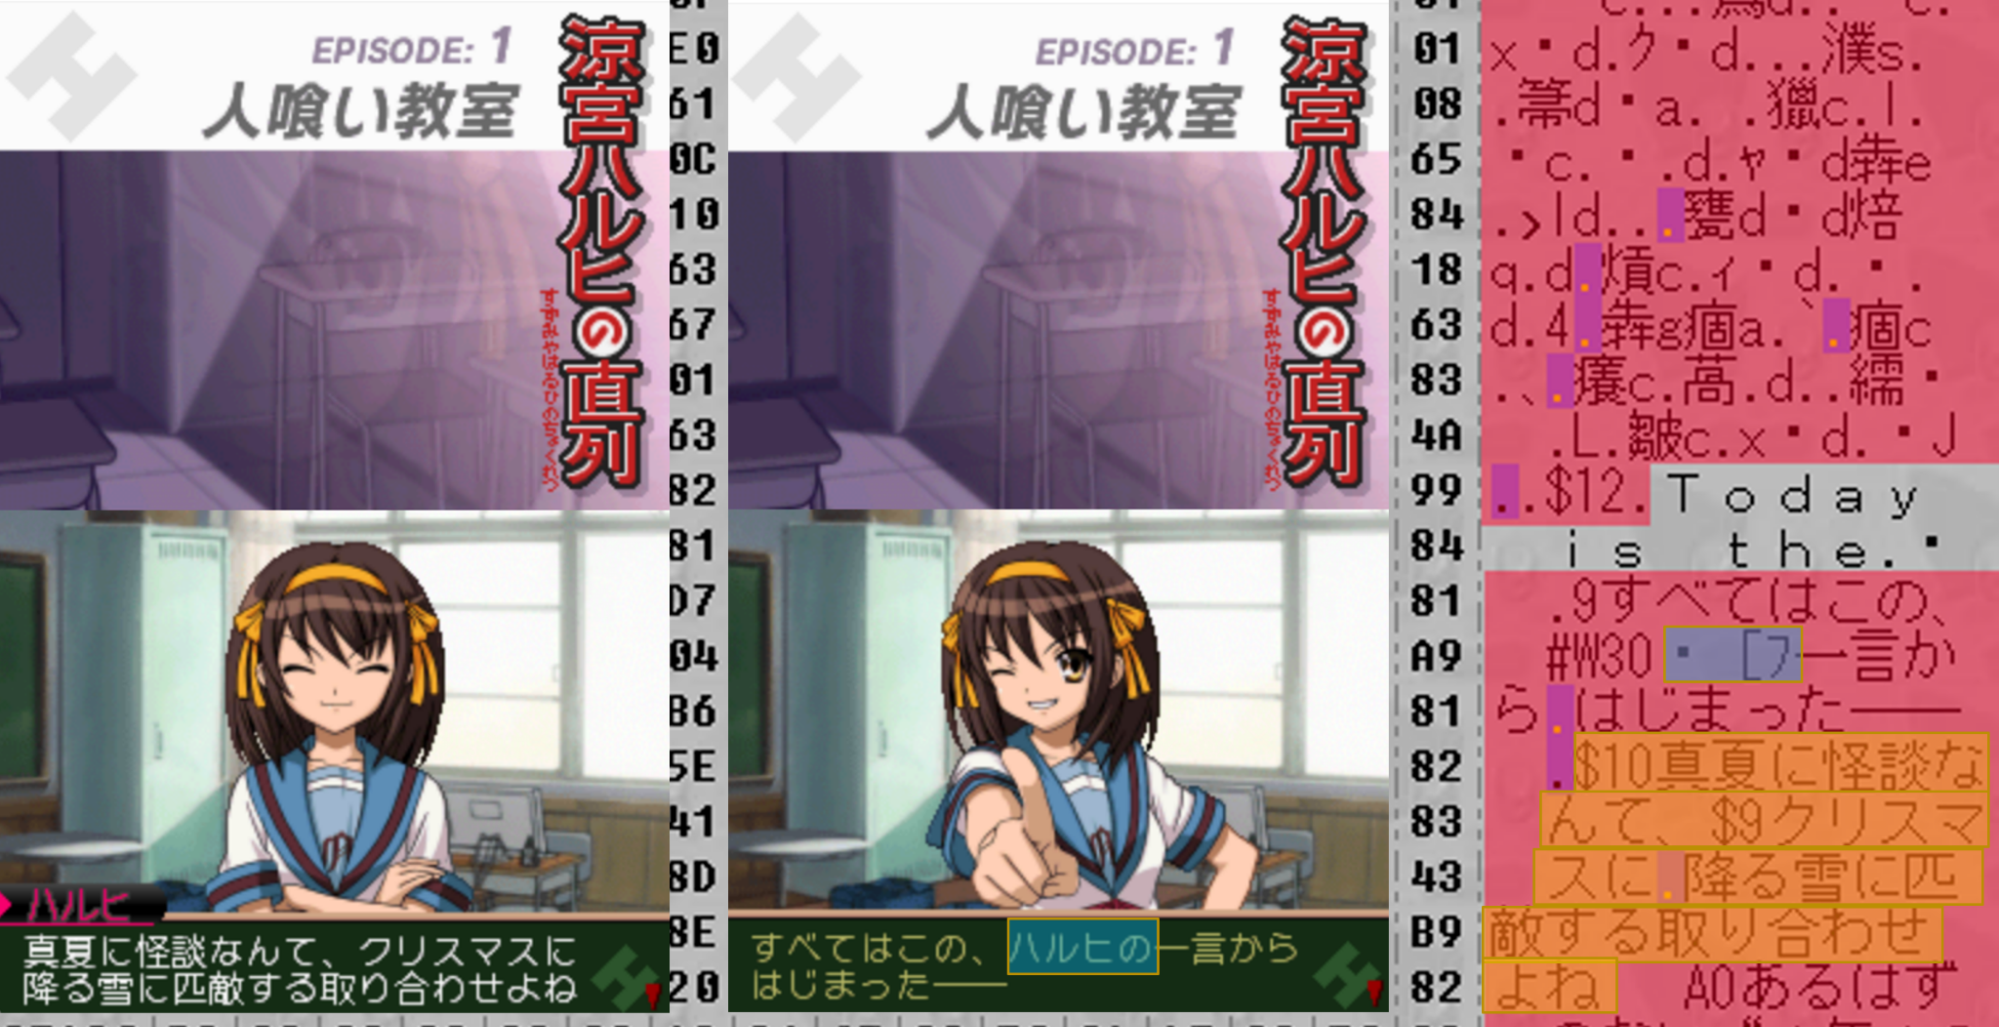
This is a sign of what’s called run-length encoding – a method for compressing a file that focuses on eliminating repetition. So okay, now we know it’s compressed – what do we do next? Well, we know our end goal: we want to replace the text in the file with English-language text. In order to do that, we will have to be able to decompress the text ourselves in order to edit the file. However, because the game expects the text to be compressed, we will also have to be able to recompress the file so we can reinsert it into the game. Well, let’s get started.
Finding the Decompression Subroutine
So we actually have a lot of information at our disposal here. We have a file that we know is compressed, we have a pretty good idea of what it decompresses to, and we know where that file is used in-game. So, let’s load the game in DeSmuME (the emulator that, at time of writing, has the best memory searcher) and search for some of the text that appears in-game.
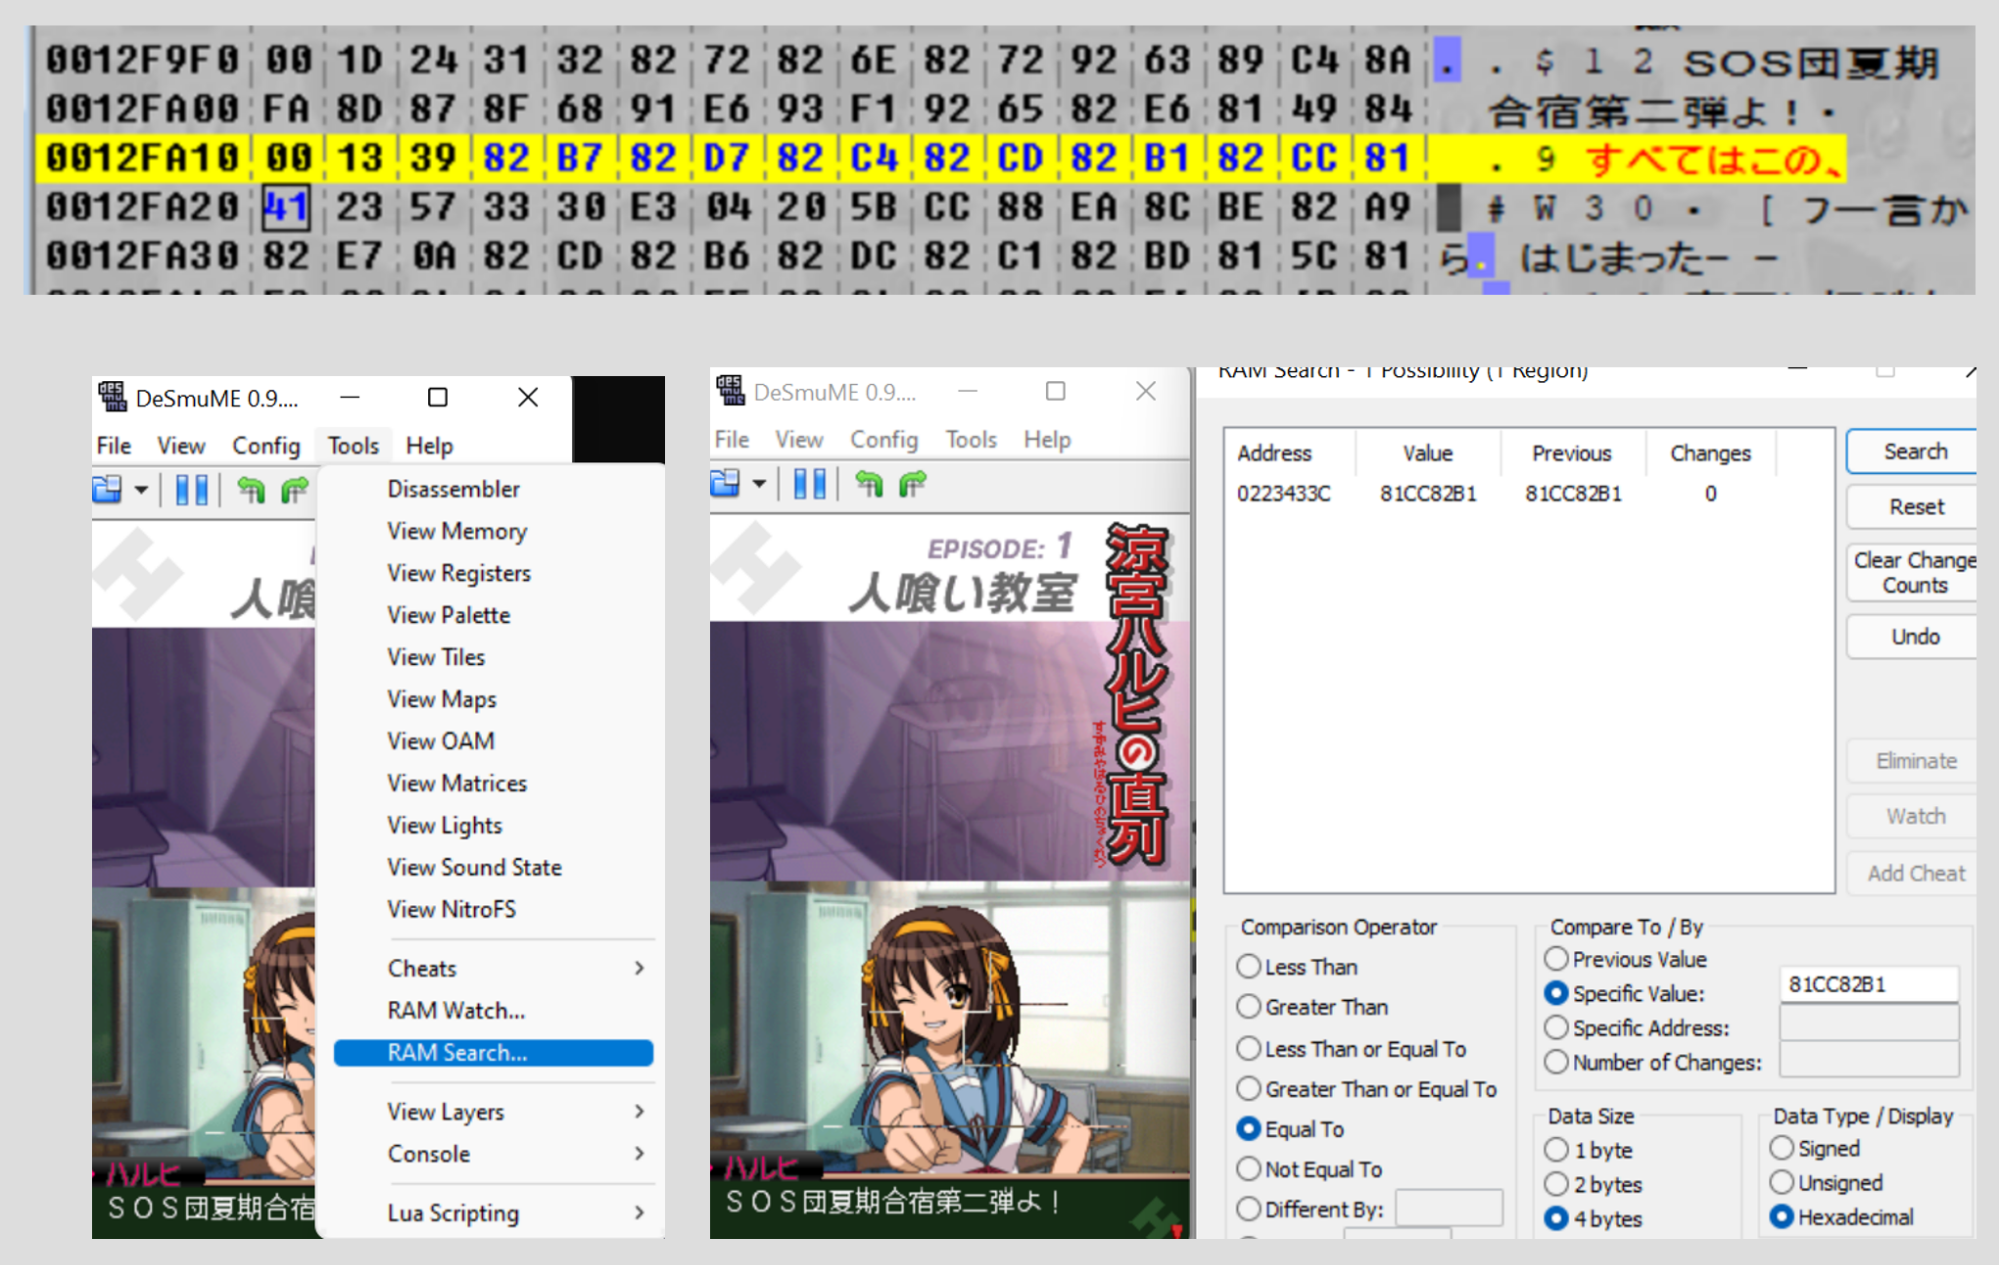
So here we’re searching for 0x81CC82B1 (DeSmuME’s RAM search expects bytes in reverse-order) which corresponds to a portion of the “この、” in the text. We find exactly one result at address 0x0223433C – brilliant. We go to that memory address…
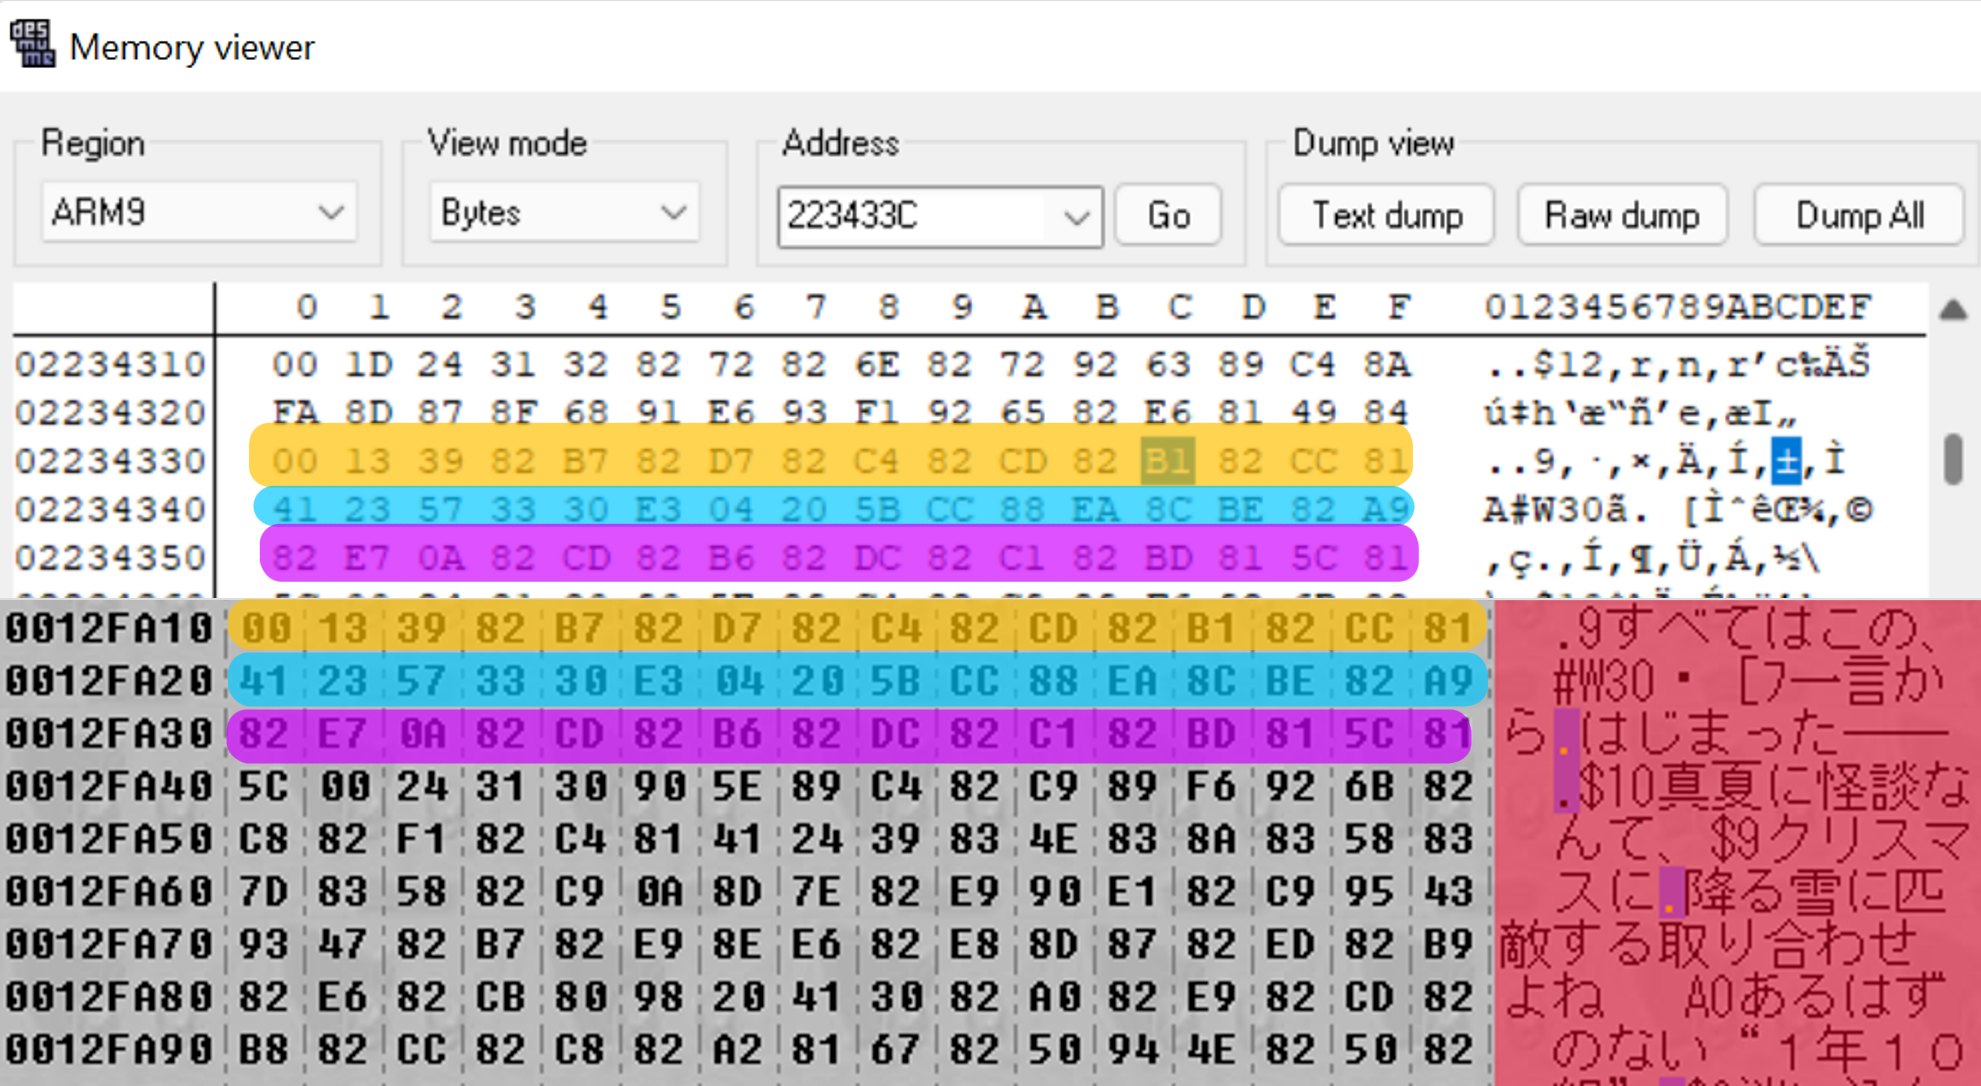
And it’s an exact match! We’ve found where the compressed file is loaded into memory. So now, it’s time to open up the worst DS emulator but also the only one with a functional debugger, no$GBA.
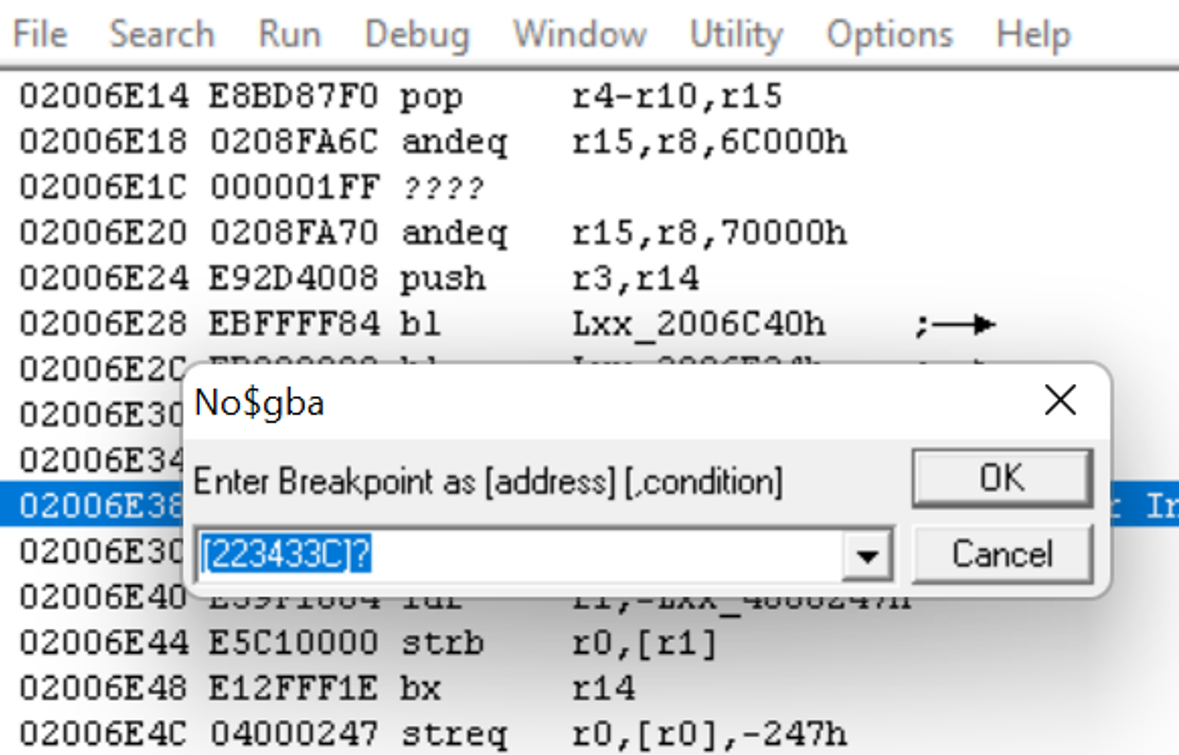
We’re going to set a read breakpoint for 0x0223433C. As I mentioned earlier, the reason we’re using no$ is because it has a debugger, and one of the functions of a debugger is the ability to set breakpoints. A debugger allows us to actually step through and see what code is executing when the game plays, and a breakpoint tells the debugger to stop at a certain line of execution. In this case, this read breakpoint tells the debugger to pause execution when the memory address 0x0223433C is read from. The reason we want to do this is that the point at which the compressed file is being accessed in memory is when it’s being decompressed, so this will help us find the decompression subroutine.
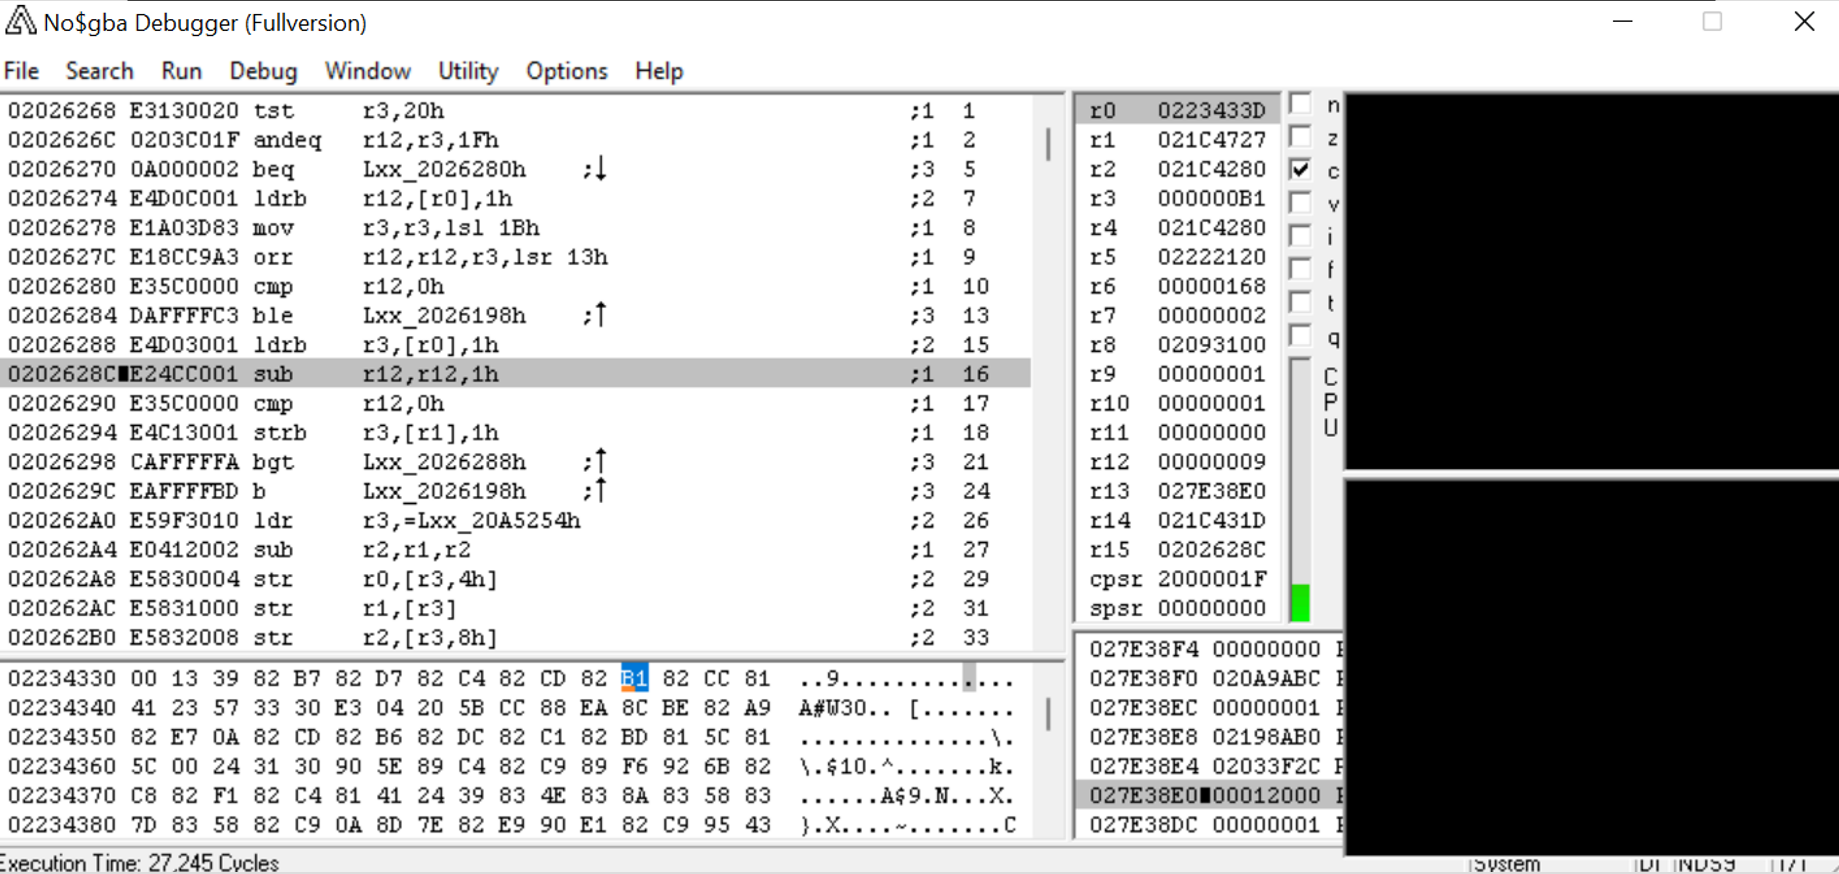
Voila, we’ve hit our breakpoint. The game reads from 0x223433C at the instruction at 0x2026288. It’s time to open our third program, IDA (the Interactive Disassembler). (It’s worth noting that while I use IDA, you can accomplish the same thing in Ghidra, another commonly used disassembler that’s actually free.)
So in IDA, we use the NDS loader plugin to disassemble the Chokuretsu ROM so we can view the assembly code (properly referred to as the “disassembly”) more easily. IDA does something very nice which is that it breaks the code apart into subroutines (also sometimes called “functions”), which makes it easier to understand at a glance where code execution starts and stops.

So we go to the address we found…
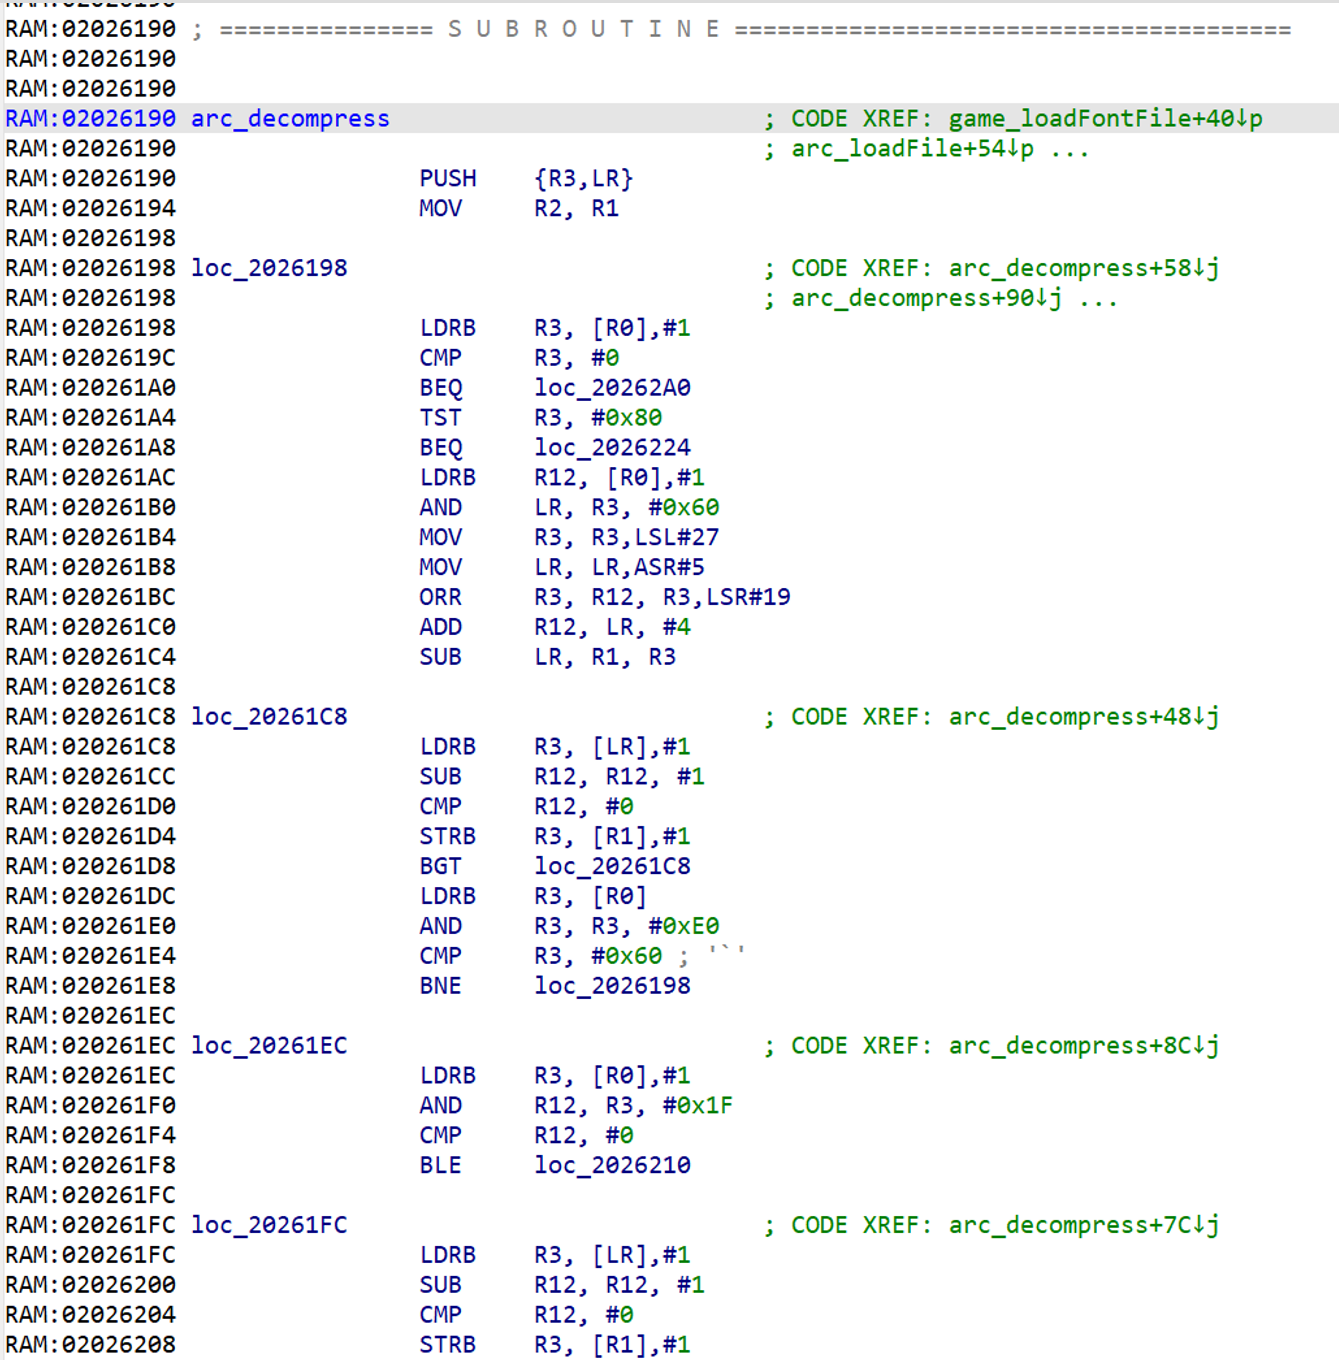
And we’ve found it! When a program is compiled, all the names of things like functions and variables get stripped away, so IDA will name the subroutine something like sub_2026190 by default – however, we’re going to manually rename this subroutine to arc_decompress (which we’ve already done in the screenshot) so that it’s easier to find and reference. (The arc there stands for archive – but we’ll have to leave that for the next entry in this series.)
So this is what I meant when I said the decompression subroutine lives at 0x2026190 – just by scrolling up we’ll find the subroutine begins at that point. This is as far as I had gotten when I replied to Cerber’s post, but this is also where the real fun begins – now it’s time to actually reverse engineer the compression algorithm.
Reverse-Engineering the Compression Algorithm
The first thing I did was to create a sort of “assembly simulator” – I ported the assembly steps line-by-line out of the disassembly and into a C# program. (The choice to use C# here is just because it’s the higher-level language I’m most comfortable with; you could choose instead to use Python, C++, JavaScript, or whatever else you’d like.) Why do this? At the time, I was a beginner with assembly, so this exercise served two purposes: firstly, it helped me become more familiar with the disassembly; secondly, it gave me a program I could run that I knew for a fact would match what the assembly code was doing.
The simulator ended up looking like this:
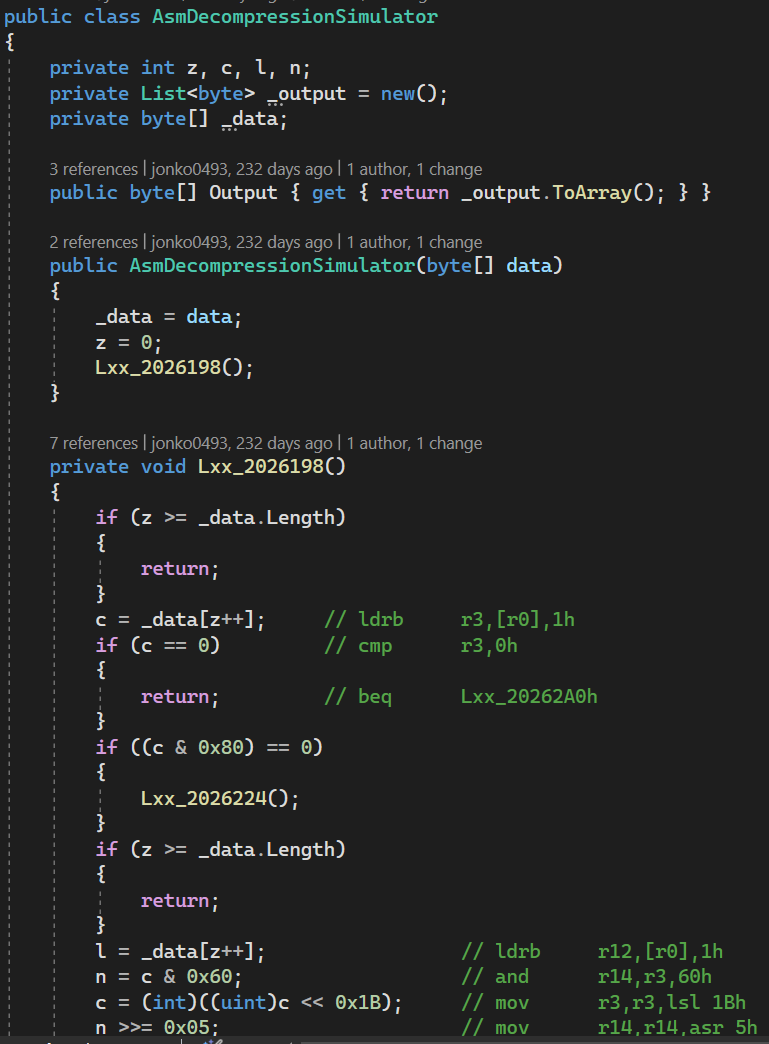
For ease of reference, I’ve annotated the lines of code with comments showing what instructions in the disassembly they correspond to. Once I completed it, I was able to decompress files naively! However, it’s pretty inefficient. So we’re actually going to try to understand this assembly in order to turn it into truly human-readable code.
An Assembly Primer
In order to do this, a quick primer on assembly: assembly is machine level code, meaning it is what the processor actually reads to execute instructions. That last word is important – the most basic unit of assembly is an instruction. Examples include things like ADD (adds two numbers) or SUB (subtracts two numbers).
To operate on values in assembly, they must first be loaded into a register. Registers can be thought of as “CPU variables” and are numbered like R0, R1, R2, etc. The DS has 15 of them. The values are loaded into registers from memory (or RAM), which is a large space of quickly accessible binary that can be referenced by the CPU on the fly.
Assembly code varies from platform to platform – more specifically, it varies depending on the architecture (which you can think of as the family or type) of microchip. The DS uses ARM assembly for its main executable, which is common and well-documented. The way I learned ARM assembly was getting right into it and debugging Nintendo DS code while looking up what each instruction was doing in another window. If you’re looking for good references for ARM, the official documentation is pretty instructive, though I also find just googling “ARM [instruction I want to better understand]” to work wonders.
Into the Thick of It
The Beginning
Let’s start at the beginning:
RAM:02026198                 LDRB    R3, [R0],#1
RAM:0202619C                 CMP     R3, #0
RAM:020261A0                 BEQ     loc_20262A0
RAM:020261A4                 TST     R3, #0x80
RAM:020261A8                 BEQ     loc_2026224
Let’s break down these instructions:
LDRB R3, [R0], #1– This loads the byte at the address contained in R0 (which contains the current position in the file) into the register R3 and then increments R0 by one (meaning we move to the position of the next byte in the file). Since we’re at the beginning of the file, this loads the first byte in the file.CMP R3, #0;BEQ loc_20262A0–BEQmeans “branch if equal,” but really it just means “branch if the last comparison is equal to zero.” Therefore, if that value we just loaded is zero, we’re going to branch to the end of the subroutine. We can ignore this for now.TST R3, #0x80–TSTperforms a bitwise-and without storing the result. A bitwise-and compares two bytes and gives a result where each bit is 1 only if that bit is 1 in both of the two bytes it compares. In the case where R3 is 0xAA, we end up with something like:
10101010 (0xAA)
10000000 (0x80)
_______
10000000 (0x80)
So this TST followed by the BEQ is just checking whether the first bit is zero or not. If it is zero, we branch to 0x2026224. Let’s branch there now (I have knowledge you don’t so I know checking this branch is going to be simpler lol). But first, we’ll convert this into C#:
int blockByte = compressedData[z++];
if (blockByte == 0)
{
    break;
}

if ((blockByte & 0x80) == 0)
{
    // Do something
}
else
{
    // Do something else
}
Pretty simple so far – we’re just checking if the first byte is zero.
Direct Write
RAM:02026224                 TST     R3, #0x40
RAM:02026228                 BEQ     loc_2026268
TST R3, #0x40– This is now checking whether the second bit is set. If it is, we’re going to jump to 0x2026268. We’ll get back to this section in a sec, but first let’s jump there after we convert this bit to C# as well:
if ((blockByte & 0x80) == 0)
{
    if ((blockByte & 0x40) == 0)
    {
        // Do something 0x80
    }
    else
    {
        // Do something else 0x80
    }
}
else
{
    // Do something else
}
RAM:02026268 loc_2026268                             ; CODE XREF: arc_decompress+98↑j
RAM:02026268                 TST     R3, #0x20
RAM:0202626C                 ANDEQ   R12, R3, #0x1F
RAM:02026270                 BEQ     loc_2026280
RAM:02026274                 LDRB    R12, [R0],#1
RAM:02026278                 MOV     R3, R3,LSL#27
RAM:0202627C                 ORR     R12, R12, R3,LSR#19
RAM:02026280
RAM:02026280 loc_2026280                             ; CODE XREF: arc_decompress+E0↑j
RAM:02026280                 CMP     R12, #0
RAM:02026284                 BLE     loc_2026198
RAM:02026288
RAM:02026288 loc_2026288                             ; CODE XREF: arc_decompress+108↓j
RAM:02026288                 LDRB    R3, [R0],#1
RAM:0202628C                 SUB     R12, R12, #1
RAM:02026290                 CMP     R12, #0
RAM:02026294                 STRB    R3, [R1],#1
RAM:02026298                 BGT     loc_2026288
RAM:0202629C                 B       loc_2026198
This is a pretty big chunk of code, but don’t let it scare you. We got this.
TST R3, #0x20;ANDEQ R12, R3, #0x1F– Now we’re testing the third bit of our first byte here. If it’s zero, we’re going to take its last five bits (0x1F = 0xb0001_1111) and branch to 0x2026280. We’ll get there in a sec.LDRB R12, [R0], #1– We’re loading the next byte from the file into a register (R12). So if the third bit of that first byte was set, it means we need to do something with the next byte.MOV R3, R3, LSL#27;ORR R12, R12, R3, LSR#19–LSLis “logical shift left” andLSRis “logical shift right,” respectively meaning to shift the bits in R3 to the left or right by 27 and 19. Shifting them left 27 and right 19 effectively means shifting left 8 after clearing the top 3 bits, which is equivalent to multiplyingR3 & 0x1Fby 0x100. With a bitwise-or, we combine the first byte and the second byte we just read into a 16-bit integer.
This is calculating something in an if-statement – we can represent it in C# like this:
int value;
if ((blockByte & 0x20) == 0)
{
    value = blockByte; // the `& 0x1F` is unnecessary since we've already determined bits 1-3 to be 0
}
else
{
    // bit 3 == 1 --> need two bytes to indicate how much data to read
    value = compressedData[z++] + ((blockByte & 0x1F) * 0x100);
}
We don’t yet understand exactly what the value does, but that will become clear when we look at the next section.
CMP R12, #0;BLE loc_2026198– If the value we just calculated is zero, we immediately return to the top of the function.LDRB R3, [R0], #1– As we’re used to by now, we’re going to load in the next byte to R3.SUB R12, R12, #1– We subtract 1 from the value we calculated earlier.CMP R12, #0– We compare the value we calculated earlier to 0.STRB R3, [R1], #1– We store the most recent value we just read in the decompressed data buffer and move one forward in that buffer.BGT loc_2026288– If R12 was greater than 0 two steps ago, we go to the first step in this section. Aha – this is a loop!B loc_2026198– If it’s less than or equal to 0, we go back to the top of the subroutine.
This is actually super straightforward now that we understand that it’s a loop. The value we were calculating earlier is actually the number of bytes (numBytes) to copy directly from the input buffer to the output buffer. Thus we can represent this section as:
for (int i = 0; i < numBytes; i++)
{
    decompressedData.Add(compressedData[z++]);
}
What’s more, the fact that we return to the top of the function each time implies that it too is a loop.
The program we have written so far looks like this:
for (int z = 0; z < compressedData.Length;)
{
    int blockByte = compressedData[z++];
    if (blockByte == 0)
    {
        break;
    }

    if ((blockByte & 0x80) == 0)
    {
        if ((blockByte & 0x40) == 0)
        {
            // bits 1 & 2 == 0 --> direct data read
            int numBytes;
            if ((blockByte & 0x20) == 0)
            {
                numBytes = blockByte; // the `& 0x1F` is unnecessary since we've already determined bits 1-3 to be 0
            }
            else
            {
                // bit 3 == 1 --> need two bytes to indicate how much data to read
                numBytes = compressedData[z++] + ((blockByte & 0x1F) * 0x100);
            }
            for (int i = 0; i < numBytes; i++)
            {
                decompressedData.Add(compressedData[z++]);
            }
        }
Decompressing a File
So essentially, the decompression algorithm operates as follows: A “control byte” is read in and the first three to four bits determine the following functions. The decompression options are:
- Read a certain number of bytes directly into the decompressed buffer
- Read a single byte and repeat it a certain number of times
- Backreference to a particular location in the decompressed data and copy those bytes forward
The full decompression implementation can be found here.
And if we try decompressing a file…
There’s the decompressed script! Fantastic.
Creating the Compression Routine
So now we understand the decompression algorithm pretty well and can decompress all the files to replace the Japanese text with English text. But if we want to reinsert them into the game, we still have to be able to recompress our edited files. So, we have to implement a compression routine. There isn’t going to be one to copy from assembly like we did with the decompression subroutine since that routine isn’t in-game (files were compressed at game creation time, they’re only decompressed in-game). But this isn’t so bad – since we know how decompression works, we just have to reverse that process to compress things.
For example, we can implement the “direct write” mode pretty easily:
private static void WriteDirectBytes(byte[] writeFrom, List<byte> writeTo, int position, int numBytesToWrite)
{
    if (numBytesToWrite < 0x20)
    {
        writeTo.Add((byte)numBytesToWrite);
    }
    else
    {
        int msb = 0x1F00 & numBytesToWrite;
        byte firstByte = (byte)(0x20 | (msb / 0x100));
        byte secondByte = (byte)(numBytesToWrite - msb);
        writeTo.AddRange(new byte[] { firstByte, secondByte });
    }
    writeTo.AddRange(writeFrom.Skip(position - numBytesToWrite).Take(numBytesToWrite));
}
First, we take the number of bytes we’re going to write. If that number is less than 0x20 (i.e. can be contained in the lower five bits of the control byte), then we simply write that number to the output buffer. Otherwise, we have to calculate the two bytes to write to represent a larger number. Finally, we simply write the bytes to the output buffer.
We can implement similar (albeit more complex) functionality for the repeater and lookback modes. The end result can be found here.
What’s Next
Now we have working compression and decompression implementations, but we’re not out of the woods yet. Next, we have to contend with the fact that this file is just one of many in an archive, and we have to figure out how to properly replace it. Join us in our next post where we delve into that.